
|
|
Micrometer Screw GaugeStructure of Micrometer Screw GaugeMicrometer Screw Gauge consists of a main scale and a thimble scale.
It is used to measure diameter of hair or anything less than 1 cm. 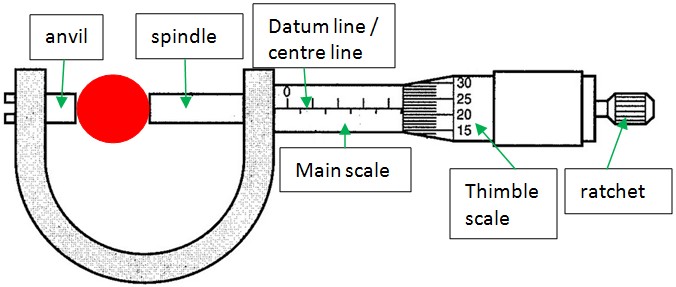
How to use?Step 1: Check for zero error. This will be covered in more details later. Here, we assume there is no zero error.
Step 2: Place the object between anvil and spindle, and turn the thimble until the anvil and spindle grip the object. Then turn the ratchet until it starts to click for careful tightening as shown in the above diagram. Step 3: Read the main scale reading at the edge of the thimble. In this case, the reading on the main scale is 4.5 mm. Take note that when taking reading, if you cannot see the vertical line marking that below the datum line at the edge of the thimble, then the reading on the main scale is 4.0 mm refer to Fig.2. 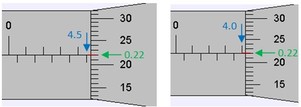
Step 4: Read the thimble scale mark that coincides with the datum line of the main scale. In this case, it is 0.22 mm.
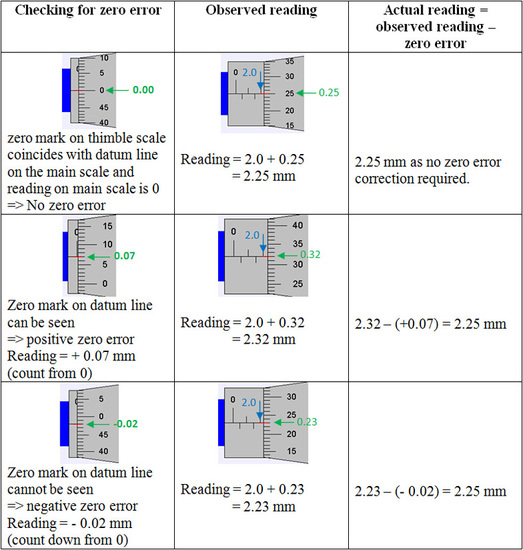
Step 5: The actual measurement is then the sum of main scale reading and thimble scale reading, i.e. 4.5 + 0.22 = 4.72 mm Zero ErrorWhen using Micrometer Screw Gauge, we have to first check for zero error. This is to check whether zero mark on thimble scale coincides with datum line on the main scale and reading on main scale is 0 when we are not measuring anything (anvil is in contact with spindle). For reading on zero error, we have to read it from thimble scale.
You can play with the applet to help you in taking the reading correctly from Micrometer Screw Gauge.
Steps in playing the applet
For no zero error case, 1) Move the vertical slider on the top left corner up to remove the object and close the screw gauge by moving the slider on the bottom right to the left. 2) Unselect "show" located at the bottom right. 3) Check for zero error. In this case, both zero marks should be coincide with each other. 4) Move the bottom slider on the bottom right to certain position and take the reading. 5) Now, select "show" to check your reading. For positive zero error, 1) Click reset. 2) Move the vertical slider on the top left corner up to remove the object and close the screw gauge by moving the slider on the bottom right to the left. 3) Unselect "show" located at the bottom right. 4) Move the vertical slider on the bottom left up to any position and then take the zero error reading. 5) Move the bottom slider on the bottom right to certain position and take the reading, and then calculate the actual reading. 6) Now, select "show" to check your actual reading. For negative zero error, 1) Click reset. 2) Move the vertical slider on the top left corner up to remove the object and close the screw gauge by moving the slider on the bottom right to the left. 3) Unselect "show" located at the bottom right. 4) Move the vertical slider on the bottom left down to any position and then take the zero error reading. 5) Move the bottom slider on the bottom right to certain position and take the reading, and then calculate the actual reading. 6) Now, select "show" to check your actual reading. |
|
